Vinyl Color Charts
VINYL COLORS & INSTALLATION INFORMATION
WET APPLICATION VINYL |
DRY APPLICATION VINYL |
|
|
|
3M Premium Scotchcal Electrocut High Performance Cast Vinyl Film
|
3M 2080 Wrapping Film (Air Release) High Performance Cast Vinyl Film
|
|
|
Avery Supercast 900 High Performance Cast Vinyl Films
|
Avery SW900 Supreme Wrap (Air Release) High Performance Cast Vinyl Films
|
|
|
AutoStripeKits.com Featuring 3M and Avery Professional Grade Cast Vinyl Films
 Dry Application : 3M 2080 Series and Avery Supreme Wrap (SW900) Air Release Cast Vinyl
Flexible, "dry" install vinyl that can be lifted up during installation to correct errors and heated up to adjust vinyl to contours. This vinyl also has air pockets to release air bubbles during install. This vinyl is recommended for all installs with a medium to hard difficulty.
- MATERIAL
Non-visible air channels "Air Release" cast vinyl for faster "dry" installation with high quality results. Self-adhesive backing with pressure-activated adhesive. Excellent long-term removability. Limited vinyl color options. - DURABILITY
Dual-layer cast vinyl films with color and clear protective layers which provide a thin smooth paint-like finish, designed to last an estimated 5 - 8+ years of harsh outdoor weather. Follow vinyl manufacturer recommendations to receive the longest vinyl life. High temperature and water resistant. Highest quality wrapping cast vinyl material available on today's market. - APPLICATION
Air release "dry installation" technology for easier and more effective installations. Vinyl has a top-premask layer, the middle vinyl layer, a lower adhesive layer, and a paper backing layer. Featuring miniature air channels on the adhesive side of the vinyl graphic, allowing for air to be easily squeegeed out from the bottom, which provides a smooth bubble-free and wrinkle-free installation on the vinyl decal surface.
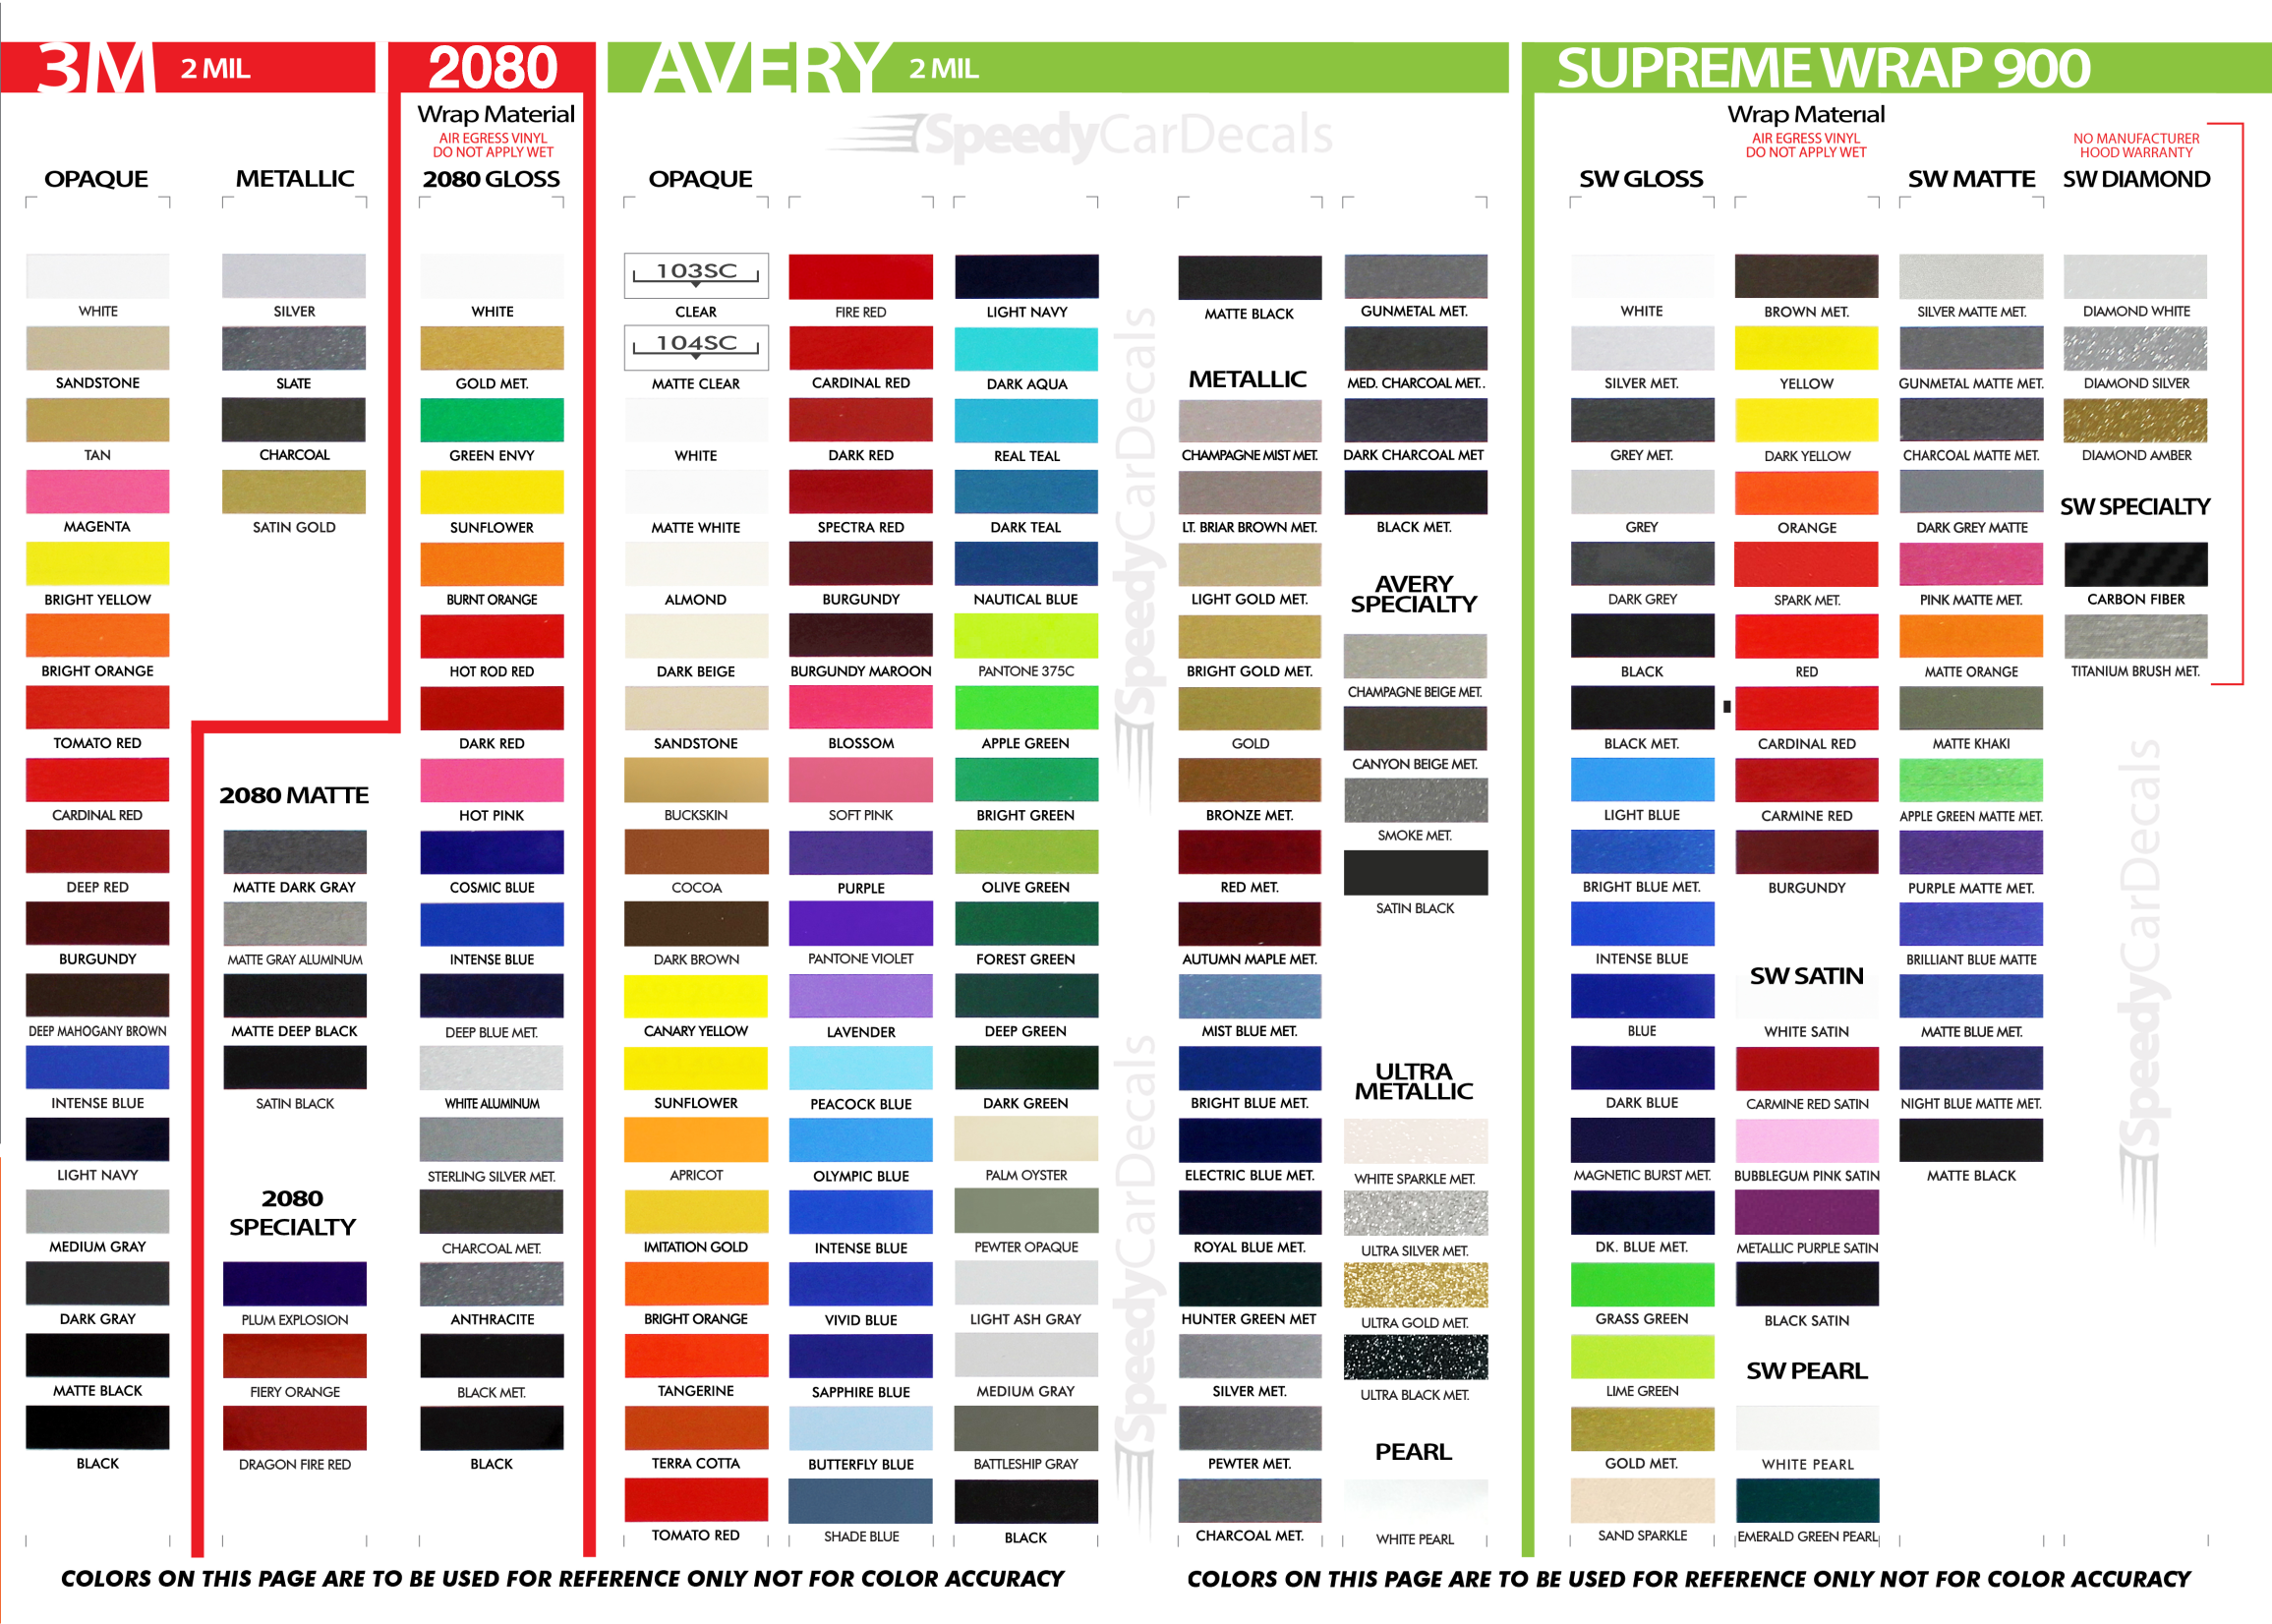
Both 3M 1080 and Avery Supreme Wrap wrapping films combine performance, versatility and convenience for faster installations. Over 40 colors to choose from offer more choices than ever before to meet your vinyl graphic needs.
 Wet Application : 3M 7125 Premium Series and Avery Dennison Supercast 900 Series High Performance Cast Vinyl
With an estimated 5-8 year life span on your vehicle, this vinyl can be applied "wet" easily with a squeegee, and allows for repositioning during installation. The "wet" installation method has been the industry standard for over 40 years and still used in most OEM factory applications.
- MATERIAL
Outdoor automotive grade cast vinyl ideal for vehicle vinyl graphics, vehicle decals and striping, windows graphics and many more automotive applications. Designed to withstand severe weather and handling conditions, and is a durable and dimensionally stable vinyl. Made in a wide range of gloss, matte, metallic and opaque vinyl colors. Self-adhesive backing with pressure-activated adhesive. Excellent long-term removability. Most available vinyl color options. - DURABILITY
Designed to last up to 8 years in various outdoor weather conditions. Cast protective layers which provide a thin and smooth paint-like finish. High temperature and water resistant. Follow vinyl manufacturer recommendations to receive the longest vinyl life.. - APPLICATION
Wet installation vinyls should use the "wet" method of installation, using a recommended wetting solution. Vinyl has a top-premask layer, the middle vinyl layer, a lower adhesive layer, and a paper backing layer. After removing the bottom paper layer, the vinyl can be repositioned because the wetting solution limits adhesion until squeegeed. Air and water solution should be carefully squeegeed out from the bottom when applying the correct pressure, which will activate the adhesive and provide a smooth bubble-free and wrinkle-free installation on the vinyl decal surface. Remove the top pre-mask layer after installation, which protected the vinyl while being installed.
Both 3M 7125 Premium Series and Avery 900 Supercast films have been used for decades in the automotive vinyl graphics industry, and have been a proven standard in performance, versatility and convenience for classic installations. Over 75 colors to choose from offer the most choices to meet all of your vinyl graphic needs.
- AutoStripeKits.com vinyl graphic kits are produced with rigorous quality ISO 9001:2015 standards to assure a beautiful vinyl product that is ready to install. Using state of the art design and manufacturing professionals, these vinyl graphic and striping decals are professionally designed and test fitted to exact vehicle specifications and measurements before being offered to automotive dealerships, and requires minimal to no trimming of the vinyl which saves the installer the risk of cutting the vehicles paint.
- Our vinyl graphic striping decals are produced in thicknesses of 2-mil to 3.5-mil, offering a thin paint like surface with a "High Performance" vinyl graphic film, made specifically for the automotive vinyl graphic industry. Vinyl graphic films from 3M and Avery Dennison offer manufacturer ratings of five to 8 plus years for life expectancy of the vinyl, when manufacturer care tips are followed.
- Our vinyl decals and graphics are easy to install, and many online resources are available for installation help. Qualified 3M and Avery "Installation Professionals" are available in your area willing to help with installation at a small cost.
- Countless hours are spent in design and test fittings for the most reliability vinyl graphic available. Vinyl quality is constantly being tested to make sure the product received will adhere to your vehicle, fit properly, and increase the value of your investment. The quality control departments we use monitor vinyl stock levels to make sure your vinyl graphic is ready to ship, and stored in a climate controlled facility.
- Whether you have a new muscle car or a late model truck, our AutoStripeKits.com vehicle specific or universal fit vinyl graphic design will add style and value. Browse the thousands of styles and color combinations we have available!
BENEFITS
- Fast shipments with most orders sent within 24 hours
- More vinyl graphic design options for modern vehicles
- Ready to install vinyl stripes out of the box
- Easier to install vinyl striping with OEM quality
- Faster vinyl decal installation with air release options
WET INSTALLATION INSTRUCTIONS
Classic Installation (Wet Method) : 3M Premium Series and Avery Dennison Supercast Series High Performance Cast Vinyl
SUPPLIES NEEDED
Application Fluid
Rubbing Alcohol
Masking Tape
Tape Measure and Pencil
Exacto Knife, Scissors and Needle
Hair Dryer or Heat Gun (Optional)
Clean, dry, lint-free cloths
Application Squeegee
Environment Recommendations
The surface temperature should range from 50 to 90 degrees to achieve the best results. If the surface is hot to the touch it's probably over 90 degrees Fahrenheit. Adhesive becomes brittle when it gets too cold and gummy when it gets too hot. Applications outside the suggested range of 50 to 90 degrees Fahrenheit decrease the ability of the adhesive to perform. Outdoor application is discouraged but can be done when winds are less than 10 mph. Blown dirt, dust or other contaminates can interfere with the bonding of the graphic adhesive to the vehicle during installation. Remove all dirt, grease, silicone, wax, etc. You may use Naphtha or isopropyl rubbing alcohol to clean the area. Go over the area where the graphic is to be installed multiple times to be absolutely sure it is ready. If you can “drag” your finger across the surface and it does not slide, then this is a good indication that the area is ready. If after installation there is a problem with the vinyl sticking, then it is because the area was not cleaned properly, and is not a defect in the vinyl adhesive.
Wet Method Recommendations
Applying vinyl with a light mist of application fluid on the surface allows for repositioning and reduces the chance of bubbles and wrinkles. The dry method does not allow for any mistakes. Once the vinyl touches the surface, there is no removal without damage. The Wet Method is STRONGLY suggested for beginners. How to make an application fluid : Use 1 tablespoon of ULTRA DAWN ORIGINAL SCENT dish liquid soap in one gallon of water. Shake and place the solution in spray bottle.
WET INSTRUCTIONS
1. Wash the surface with the solution of dish soap and warm water then rinse with water. Dry the area with a clean, lint-free cloth or paper towel. Wipe down the entire area again with Isopropyl Alcohol to remove any contaminants and promote the adhesion process. Dry the surface a final time with a fresh lint-free cloth or paper towel.
2. Determine the location where you want the vinyl transfer to go. Use a tape measure and a pencil to help center the item in the space available. Secure each end or corner with a piece of masking tape.
3. Apply strips of masking tape vertically to the center of the vinyl transfer, over the premask. This creates a hinge allowing the graphic to be applied one section at a time.
4. Remove the positioning tape from one end of the vinyl transfer and hold down the release liner while slowly peeling the premask away back towards the hinge. The vinyl will remain on the premask. Temporarily tape the peeled section to the surface and cut away the release liner with a knife or scissor.
5. WET METHOD - Lightly spray the vehicle surface with the soap and water solution. Hold the end of the vinyl transfer several inches away from the surface and slowly lay the vinyl transfer down from the hinge outward and firmly squeegee over the premask with short overlapping strokes. The wet method will allow you to re-position the vinyl as needed and reduce the chance of air getting behind the vinyl. Now, remove the tape hinge and peel away the release liner on the other side of the vinyl transfer. Spray and apply this section the same way as the other.
6. Wait up to 30 minutes to remove the premask if you used the wet method. Starting from a corner, slowly peel away the premask directly across itself at a 180 degree angle. Carefully re-squeegee any areas that seem to lift. After the premask is dry cover the squeegee with a rag or paper towel and go over the vinyl again, especially around the edges. Examine the vinyl for bubbles and prick them with a pin and squeegee the air out towards the puncture. A heat gun or hair dryer will assist in the removal of bubbles. Leave vehicle temperature above 45 degrees for 48 hrs to allow vinyl to cure.
DRY INSTALLATION INSTRUCTIONS
Modern Installation (Dry Method) : 3M 2080 Series and Avery Supreme Wrap (SW900) Air Release Cast Vinyl
Wrap Vinyl Installation Instructions
Application Temp: Air, film, and application surface temperature are important and must match the characteristics of the adhesive and film being applied. 50F is the absolute minimum application temperature for film, air, and substrate. Material applied at the minimum temperature MUST be allowed to set for a minimum of 24 hours, or until graphics have completely set, verified through visual & physical inspection. While the film can be applied at the lower end of the temperature range, more pressure will be needed and it will take longer for a functional bond to be achieved during application. Until a “functional “ bond is achieved, it is risky to remove premask or allow a vehicle to be transported. Higher heat and humidity conditions may also make a graphic more difficult to re-position once it has made contact with the applications surface. If the air temperature or the application surface temperature exceeds 100F, performance may be limited. The ability to move trapped air can be adversely affected by the amount of pressure used previously to apply the graphic to the substrate. For optimal application performance and ease-of-use characteristics, apply wrap films at a temperature of 70F to 80F. Allow 24 hours for graphics to fully set prior to placing graphic marked vehicles into service.
Application Instructions:
Wrap films have a high degree of conformability compared to other cast vinyl films. On surfaces with extreme contours wrap films show excellent results. To achieve these results, the use of an industrial hot air tool is needed to improve the ease of application. Important: After application it is absolutely necessary to POST HEAT parts exposed to stretch, strain or other deformations to obtain its final shape. Post heating will eliminate the applied tensions in the film. The target post heat temperature (for vinyl and substrate) is 175F -195F wrap films are designed for dry application to prepared surfaces; this application process will be described in this document.
Application Notes:
CAUTION: NEVER USE WET APPLICATION FOR WRAP FILMS!
*Ensure that the application surface is clean and dry before application of any graphic film.
*Be sure the air, film, and substrate are with the temperature range recommended for the film.
*Experiment with what tool and technique works best before applying large graphics. Wrap films are designed to work with a variety of tools and techniques. Whatever the tools or technique, it is important to use enough pressure to make sure the graphic firmly adheres to the substrate.
*Overlap all strokes by 50%.
*Always ensure your squeegee has a smooth edge without nicks. This ensures a smooth graphic finish after application is completed, and that 100% of the adhesive has made contact with the vehicle substrate.
*If a squeegee is used, hold it at 50-70 degree angle to the surface. The flatter the squeegee the better! Locate where to position graphics and mark the spot using small pieces of masking tape. If the graphic is large, tape it into position securely with masking tape hinge method. Magnets can be used in a similar manner.
*Squeegee the film using moderately firm, overlapping strokes. Make sure the material has made 100% adhesive contact with the entire length of the stroke.
*Remove air bubbles and tenting around rivets by using an air release tool and heat source.